728x90 Ad Space

Showing posts with label SEO. Show all posts

Saturday 1 February 2014

How To Install Google Analytics In Blogger?

2/01/2014


Previously We've Discussed About Increasing Back-Links Of Your Blog, Now Let's Learn About Google Analytics. Blogger Is A Best Platform To Use And It's Easy. It's Main Advantage Is That The Template Is Customizable. As You Know That Blogger Platform Is Growing Day By Day, The Policies Are Also Growing For It. There Are Many Things You Can Do In Blogger. Every Webmaster Wants To Know The Information Of His Blog Visitors That Where His Audience Are Coming From Or What Browser They Are Using. Yes, This Is Possible By Google Analytics. Well This Is A Free Tool To Check Your Blog's Statistic. So In This Post, We Will Describe About Google Analytics And It's Full Benefits. So Let Me Explain You First That What Is Google Analytics, Then We Will Use In Blogger.

What Is Google Analytics

Well, Google Analytics Is A Simple Tool For Checking The Statistics Of Your Blog. This Tool Also Belongs To Google. You Can Check Whether Visitors Are Coming From Which Country, From Which Browser And Many Data. They Will Provide You Complete Track Of Your Blog. Blogger Has Also It's Own Tool To Check The Data But It Don't Provide Full Data. Now We Will Describe The Benefits Of Google Analytics.

  • Track Real Time Visitors :  This Is The Best Feature Of Google Analytics That You Can See The Full Data Of Your Online Visitors Coming From. This Is A Section Of Where Your Data Of Real-Time Visitor Will Be Stored. It Will Display From Where Are Your Visitors Coming From, On Which Page Is Active, And All The Geographic Data Of Your Visitor.
  • Location : This Is Also A Great Feature Of This Tool That You Can Track Your Visitor's Location From Where Are They Coming From. Actually, This Is A Geographical Location Of Your Visitor. This Will Help You Know Your Visitors Whole Data Of Location. It Will Never Give You Wrong Data.
  • How Much Time They Have Spend : This Tool Will Help You Know All About The Data That How Much Time Your Visitor Have Spend It On Your Site. Even It Is For Page-View. It Highlights Those Page Which Have The Lowest Bounce Rate.
  • From Where Traffic Is Coming : This Tool Will Help You Know The Information Of Your Traffic Coming From User, Search Engines Or From Other Website. So This Will Provide You Full Data Of Your Traffic Coming. It Will Always Tell The Accurate Result Or Information Will Fully Detailed.
  • OS, Browser And Much More : So This Tool Will Also Give You Accurate Result Of Your Visitor's Browser, Operating System And Service Provider. Which Means That It Will Let You Know About Your Visitor's Operating System And Browser They Have Used For Arriving On Your Site.
  • Page Views, Unique Visits And Much More : So Tis The The Feature Of This Tool That When The Day Has Ended, You Can Finally Check Your Page-Views Of The Total Day And Visits.  If You Are Getting High Number Of Visits, It Means That Your Website Is Useful To Many Peoples.
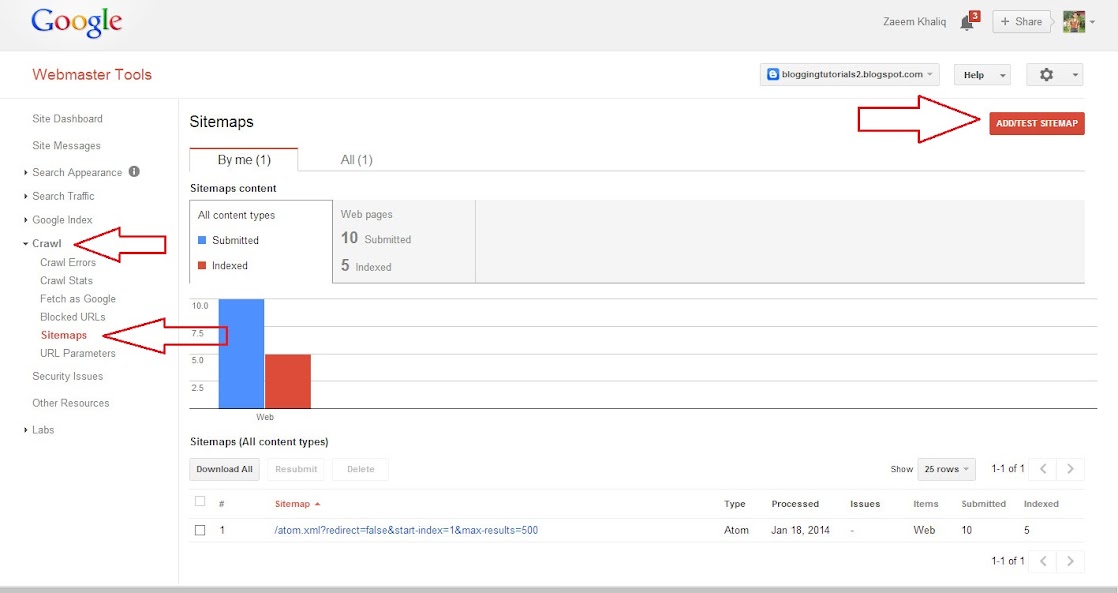
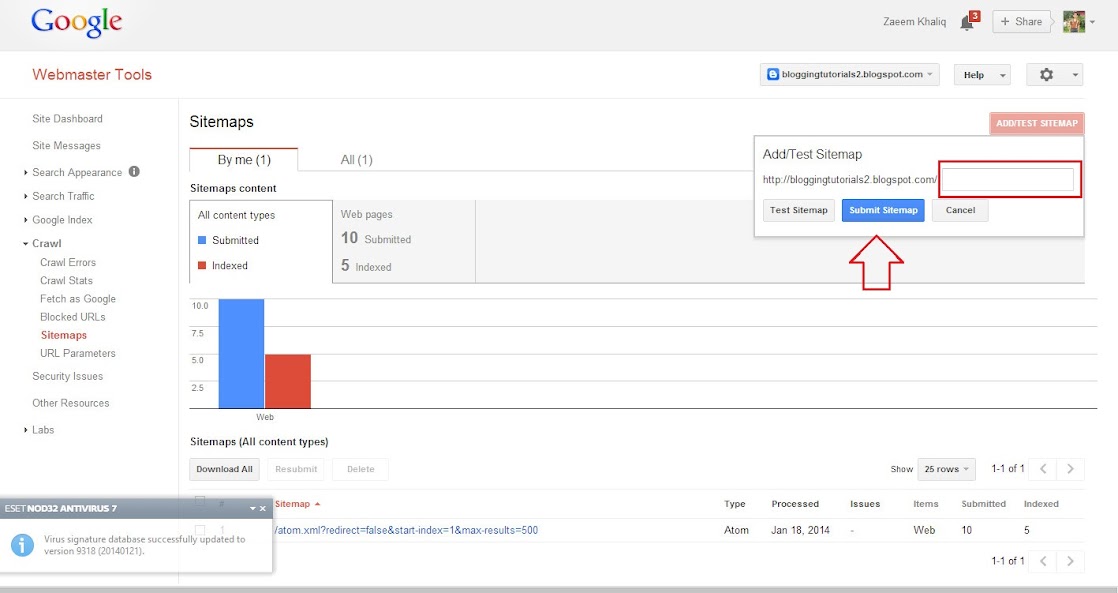
  • Must Read : How To Submit Your Sitemap To Google?
This Was The Few Benefits Of This Tool But There Are So Much Which Is Unbelievable.

How To Install Google Analytics In Blogger?

After Describing And Leaning The Benefits And Usage Of Google Analytics, It's Time To Install It In Blogger. This Is A Simple Method, You Just Have To Follow Two Main Steps. The First, You Will Create Your Website Data On Google Analytics, Then You Will Add It In Blogger. So Let's Start With Few Simple Steps:-

1# Joining Google Analytics

  • Go To Google Analytics.
  • Sign In With Your Google Or Gmail Account (Both Are Same).
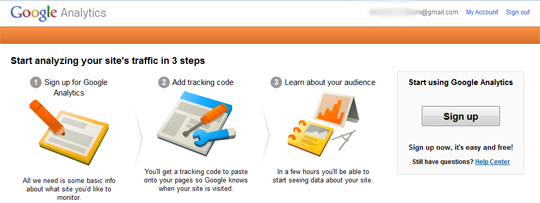
  • Click On "Access Google Analytics" On The Top-Right Of Your Web Page.
  • Now A Screen Will Appear, There Will Be Written Big "Sign Up" Button, Click On It.
  • Now Click On "Website" Which Is Default Because There Is Also A Mobile App Tracking Method. Select "Universal Analytics" Now Come Below And You Will See A Form.
  • Just Fill The Form With Your Information.
  • Now First There Will Be Written "Account Name" Just Write Your Account Name (Google Account Name), In The Above Image There Is No Account Name Option But You Have To Write, Then Fill The Form Like The Above Image, Then Click On "Get Tracking ID".

  • Now A Box Will Appear Asking You To Read Their Policy And Select Your Country, Just Read Their Policy And Click On "I Accept" Button.
  • Now A Congratulations Message Will Appear, Now Your Tracking ID Has Been Created. Now Let's Move To Next Step And Install It In Blogger {Note : Don't Close Google Analytics Tab}.
  • Now Copy And Paste Your Website Tracking ID In Notepad.
  • Now Let's Move To Next Step.

2# Installaing In Blogger

So, There Are Two Ways To Setup, I Have Describe Both Methods Below, Take Any One You Like It.

#2.1 Installing With ID

  • Copy Your Analytics Code In Notepad As I Described Above.
  • Go To Blogger.com >> Your Blog >> Settings >> Other.
  • See At The Bottom Of Your Page, There Will Be Written "Analytics Web Property" And A Box On The Right Of The Option, Just Paste Your Tracking ID There.
  • You've Successfully Installed!.

#2.2 Installing With Code Method

  • Go To Blogger.com >> Your Blog >> Template >> Edit HTML.
  • Search For </body> Tag.
  • After Finding The Above Code, Paste The Following Code Above </body> Tag.
<script type="text/javascript">
  var _gaq = _gaq || [];
  _gaq.push(['_setAccount', 'UA-XXXXXXXX-Y']);
  _gaq.push(['_trackPageview']);
  (function() {
    var ga = document.createElement('script'); ga.type = 'text/javascript'; ga.async = true;
    ga.src = ('https:' == document.location.protocol ? 'https://ssl' : 'http://www') + '.google-analytics.com/ga.js';
    var s = document.getElementsByTagName('script')[0]; s.parentNode.insertBefore(ga, s);
  })();
</script>

  • Now Replace UA-XXXXXXXX-Y With Your Tracking ID You Have Got It From Google Analytics Which Is Saved In Notepad.
  • Now Click On Save Template.
  • CONGRATULATIONS!. You've Successfully Installed!.

Final Words!

So Friends, That Was The Simple Tutorial For You To Install Google Analytics In Your Blogger. Now After Installing It On Blogger, It Will Take 4 To 5 Hours To Display Your Data Then Your Google Analytics Account Will Be In Your Control. But One Thing Remember That Use The First Step To Install "Analytics Web Property" If The Second Step Doesn't Works. But One Thing Remember That Don't Use Both Methods Otherwise It Will Not Work Properly. I Hope This Post Will Help You Getting Information Of Your Blog Visitors And Much More. We Will Provide More Tutorials. Please Share This Post With Your Friends And Blogger Fellows And On Social Networks. Get In Touch In Us For More!, Also Subscribe Us Now To Receive Hot Updates Straight In Your Inbox. Take A Lot Of Care And Happy Blogging!.

Friday 31 January 2014

Tips To Increase Back-Links Of Your Blog

1/31/2014


Previously We've Discussed About Tips To Increase Traffic On Newly Made Blog, Making Your Blogger Posts SEO Friendly, Tips To Write Unique And Professional Blog Posts, Now We Are Back With Another Great Tip For You. This Is Also A Lesson Of About SEO Which Is Baclinks Of A Blog. Backlinks Help A Blog To Improve His Backlinks And Traffic. It Also Increases Alexa Ranking. So If You Don't Know What Are Backlinks, We Are Going To Discuss About It. So Let's Begin The Discussion About Backlinks Of Your Blog.

What Are Back-links

Back-Links Are The Incoming Links From Another Website Who Is Interested With Your Post. Or Those Which Are Landed From Other Blog To Your Blog Is Also Called "Back-Links" Means That You Are Getting Backlinks From Other Website By Landing Their Audience To Your Site.

Why To Build?

This Is Very Important Thing Of SEO That You Should Build Your Backlinks That Will Help You Increasing Your Traffic And Page Rank. After Building Your Back-Links, Many Sites Will Be Linked To Your Site Means That Your Will Gain More And More Traffic And Improves Ranking. Alexa Ranking And Google Page Rank Is The Need Of Every Blogger Because This Will Help Your Blog Become Famous On Search Engine.

1# Build Quality And Most Loved Content

Content Is The Main Thing For A Blog. It IIs The One Thing That Improves Your Blog Traffic And Help Increasing Your Backlinks On Your Blog. For This, You Will Need To Publish A Post That Should Be Most Loved (Interestingly) And Unique Content Which Will Impress Your Audience And Take Their Attention. Ask Your Audience What They Want To Give Them, Then Give It. Now If The Post Is Very Lovingly, Your Readers Will Read Carefully, Then They Will Share Your Post, Then Your Backlinks Will Increase Very Fastly. E-Books And Other Resources Are The Best Thing That Your Visitors Likes And Get Shared With Their Friends.

2# Guest Posting

This Is Also A Great Method To Gain Backlinks From Other's Blog That You Should Guest Post On Other Site. You Should Give Them Your Full Bio With Picture And With Your Blog Link. Then Make Lengthy And Loved Content, Now If Someone Likes The Post, At The End He Will See Your Blog Link And Bio. Then He Will Land On Your Post. So This Will Also Increase Your Back-Links. But One Thing Remember That Post Only On The Sites Which Are Very Popular So Your Backlinks Should Increase Very Fastly.

3# Commenting

This Is Another Trick To Improve Your Back-Links That You Can Comment On Other's Blog Along With Your Blog Link So That They Should See That What Your Blog Contains And What The Template You Are Using. This Is Done By Many People Because They Are Interested. You Can Also Comment On Wordpress Blog's Because Wordpress Is Also A Popular Site Which Is Similar To Blogger But Wordpress Is Used By Big Webmasters And Professional. Blogger Can Be Used By Teens. Only Post A Homepage Link On Other's Blog Comments Because They Can See Your Articles On Homepage. Don't Comment Like A Robot, Means That Don't Comment Spam In Comments Otherwise The Blog Owner Will Not Publish Your Post And You Will Also Loose Your Ranking And Can Be Harmed By Google Panda Update. But One Thing Remember That Comment On Only Blogs Which Are Using CommentLuv Or KeywordLuv Commenting System Because This Will Help You Insert Your Blog Link Easily.

4# Social Media Promotion

As You Know That The Social Networks Is Also Used By Many People Like Facebook Is One Of The Most Popular Social Network. So This Is The Good Idea To Take Benefit From It. First Publish Your Content And Then Share On Social Networks To Increase Your Back-Links. This Will Also Help You In Increasing Your Traffic Through Social Networks.

5# Join Forums

So This Is Also A Good Method  To Increase Your Traffic And Back-Links. In This Method, You Have To Join Some Forums Which Must Be Related To Your Blog After Joining The Forum, You Have To Publish Some Question And Threads. After Adding The Sign Of Welcome, Make Sure You Include Your Blog Link So That The People Must Land On Your Blog So This Will Help You Increasing Your Back-Links Through Forum.

Final Words!

So Friends That Was The Tips For Increasing Your Blog's Back-Links And Improving Your Traffic. I Hope This Tip Will Help You A Lot And It Will Also Help In Increasing Alexa Rank And Page Rank. Every Newbie And Blogger Must Try These Tips.  Get In Touch With Us To Receive More Updates. Subscribe Us Now To Receive Hot Updates Straight In Your Inbox, No Spam. Share This Post With Your Friends And Blogger Fellows And On Social Networks. Take A Lot Of Care And Happy Blogging!.

Thursday 30 January 2014

Tips To Increase Traffic On Newly Made Blog

1/30/2014


As You Know That Blogging World Is Growing Day By Day And People Are Getting Famous On Internet By Making A Professional Website Which Is Learned By Everyone. Have You Ever Concentrate On Post Images?. If Not Then See It. Well, This Is Good To Have Fun With Readers To Be More Friendly. So Today's Post Is About Increasing Your Traffic On Newly Mad Blog. We Are Going To Discuss Some Secret Tips Which Will Improve Your Blog Traffic Because It Is The Every Need Of Blogger That His Site Must Be One First Position. But For This, Remember To Hard Work, Don't Copy Other's Content. Hard Work Will Bring A Lot Of Traffic From Search Engines And Users. The More Traffic You Get, The More Your Earnings Are Increasing. You Can Build Your Blog Traffic With The Following Tips Below Which I Am Going To Discuss With You. Now Let's Learn About It.

Build Quality And Professional Content

So This Is The Main And Important Thing For Everyone That They Should Build Their Content Which Are Best Quality And Professional Looking To Increase Your Traffic Because If Your Content Will Not Build, Your Blog Is Nothing To Do. You Should Post Atleast One Or Two Posts A Day Regularly Or More Than It. If You Want More Visitors, You Should Post More For Getting High Number Of Visitors. Your Content Must Be Unique And Quality And Should Not Be Copied From Other Websites Otherwise It Will Help Your In Decreasing Your Traffic.

Make Your Blog And Template SEO Friendly

Another Important Thing For A Blog Is It Should Be SEO Friendly (Search Engine Optimization Friendly). By This Your Blog Will Get Indexed By Search Engine Crawlers And Your Post Will Appear Fast In Search Results On Search Engine. Means That This Will Help Your Increasing Your Traffic Through Search Engines, The More The Blog SEO Friendly, The More You Will Receive Traffic. To Make Your Blog SEO Friendly, You Have To Make Some Changes With Blog And Yourself. I Think That We Have Discussed These Topics With Detailed. If You Haven't Read These Articles, Then You Should Read These. There Are The Following Two Posts To Make Your Blog SEO Friendly.

After Learning About Content Building And Making Your Blog SEO Friendly, You Should Learn That How To Submit Your Blog's Sitemap  To Search Engines. This Will Help You To Display Your Search Results Faster On Different Search Engines. Your Blog Will Be Indexed By Search Engine Crawlers And After Crawling, Your Posts Will Start Appearing On Search Engines. To Display Your Search Results On Different Search Engines Like Yahoo And Bing, You Will Need To Submit Your Sitemap To Search Engines. You Can Also Enable Custom Robots For It To Receive More Traffic From Search Engines. We Have Already Discussed About These Topics With Detail That How We Can Submit Sitemap To Google, Yahoo And Bing. You Can Also Submit It By Reading The Following Articles Below:-
After Submission Of Sitemap To Google, Yahoo And Bing And Making Your Blog SEO Friendly, Now It's Time To Accept Guest Posting On Your Popular Blog To Increase Your Blog Posts And To Update It Regularly. Before Submitting Guest Post, You Should Check Whether It Requires The Requirements Of Yours, And It Should Also Contains It's Blog Link And Author Bio, This Will Help The Submitter To Increase His Back-Links By Landing Your Audience On His Blog. If You Are Publishing A Guest Post, Also Check That You Are Writing Your Posts Similar To His Blog Niche. Also Send Them Your Picture With Bio. This Will Help You Increasing Your Backlinks And Page Rank And You Will Also Get More Traffic From His Blog.

Commenting On Blog

So This Is Also A Good Tip For Everyone That You Should Also Comment On Other's Blog. You Should Comment On Other's Blog And Should Paste The Link Of Your Blog So That The Audience Of His/Her Blog Should Also See Your Blog Link. This Will Help You Increasing Your Blog Traffic And Also Help In Increasing Your Back-Links. But Make Sure That The Blog Which You Are Going Comment Should Have CommentLuv System Because This Will Help You Give Your Blog Link.

Sharing Posts On Social Networks

This Is The Common Thing Done By Many Blogger That They Share Their Posts On Social Networks. If You Don't Know That Is This, Let Me Tell You. Firstly You Have To Join A Social Networking Site Like Google+, Facebook, Twitter Or Any Other. On That Site, You Must Have Good Readers, Likers And Followers Because This Will Help Your Friends To Read Your Article On Your Website. So You Have To Publish A Post On Your Blog, Then Share It On Facebook Because Facebook Is The Most Used Social Network In The World, Also Share This On Google+ And Twitter. You Can Also Enable Automatic Share On Google+ System In Your Blogger. This Will Help Your Increasing Your Traffic From Social Networks.

Advertise Your Blog

So This Will Also Help Improving Your Blog Traffic Rapidly By Advertising Your Blog On Social Networks And On Other Websites. You Will Need Some Bucks.  You Can Also Advertise Your Blog Through Google Adwords. You Can Also Advertise On Other's Website As A Advertise Because You Will Upload Custom Banner, So Upload Your Site Banner With Description On It. I Recommend You To Use Google Adwords Because It Will Show Your Ads On Different Sites And Search Engines, You Will Get A Lot Of Traffic.

Offer Giveways On Your Blog

This Is Also A Great Tip For A Blogger And Is Loved By Everyone. The Thing Is To Offer Giveways On Your Blog. This Will Help Your Increasing Your Traffic And Getting More Likes And Tweets On Social Networks. In This Method, You Have To Offer Giveways And You Can Offer Anything In It, The More Expensive Thing You Offer, The More People With Participate In Your Offer. This Will Increase Your Facebook Likes And Visitors. I Recommend You To Use Punchtab Giveways Because It Is The Most Beautiful Design Which Will Allow To Make Entries. It Means That You Are Saying That Like And Follow And Tweet And Much More To Gain Points. The One Who Will Be Having More Entries, Will Be The Winner And You Can Do Personal Talk With Him And Give Him The Thing That You Have Offer.

Your Turn!

Good, After Reading The Above Article, I Think You've Got All The Points And Tips Of Increasing Your Traffic On Newly Made Blog. Now You Should Try It On Your Blog. I Hope That This Will Help You Increasing Your Blog Traffic Extremely Highly By Applying All Of The Above Tips. If You Have More Tips To Share With Us, Then Don't Forget It. Share This Post On Social Networks, Friends And Blogger Fellows. Get In Touch With Us For More Hot Updates Also Subscribe Us To Receive All Of The Updates Straight In Your Inbox. Take A Lot Of Care And Happy Blogging!.

Sunday 26 January 2014

How To Redirect Your Old Posts To New Posts In Blogger?

1/26/2014


As You Know That Blogger Is A Suitable Platform For Newbies To Blog And Can Easily Drive Handsome Traffic From Search Engines And Can Increase Their Chances Of Earning Money. We Have Discussed About Many SEO Articles Including Custom Robots.txt File In Blogger, Custom Robots Header Tags In Blogger, Adding Meta Description In Blogger Posts And On Many Topics. But Now, We Will Discuss About "Search Prefrences" Section, The "Custom Redirects" Settings In Blogger. So Let Me Tell You What The Custom Redirect Is.

What Is Custom Redirect?

A Custom Redirect Is A Way Of Setting Your Old Post Link To New Post Link. It Means That If You Want The Visitors To Go To New URL Instead Of Old One, Then You Will Do It. For Example I Have Posted A Post Named "Make Your Blogger Template SEO Friendly" And I Want My Audience To Go To "How To Redirect Your Old Posts To New Post" This Post, Then I Will Use The New Link, Then When Your Audience Will Click On The Old Post, It Will Automatically Redirect To New Post Which Is How To Redirect One. So This Is A Simple Way To Redirect It. It Also Redirects From Google Search Results, If They Click On The Old Link From Search Engine, It Will Automatically Redirect To New Link. Then They Will Not Be Able To View Your Old Post Until You Will Say. If You Remove The Custom Redirect, Then Your Old Post Will Not Redirect. It Is Also Good For Adding In New Posts To Increase The Traffic Of Old Posts. So Know, I Will Tell You How To Do This (Redirect Your Old Link To New) In Blogger. Just Follow The Simple Steps Steps:-

Instructions

Redirecting Old URL To New URL Is A Simple Step, You Just Have To Select Your Old Link And Your New Link And Paste It. So Let's Get Started:-
  • Go To Blogger.com >> Your Blog >> Settings >> Search Prefrences.
  • Now In The "Errors And Redirection" Section, See The "Custom Redirects" Settings.
  • Click On Edit Button On The Left Of The Option.
  • Now Two Boxes Will Appear, One Of Old URL And One Of New URL.
  • Just Paste Your Old URL In The Old URL Box And The New URL In The New Box.
  • After Putting Your Two Links, Click On Save Button, Then Click On "Save Changes" Button.
  • If You Want Another Redirection, Click On "New Redirect".
  • If You Want To Remove Your Redirection, Click On "Delete".
  • If You Want To Just Disable It, Uncheck The Box In Above Image.
  • After Saving Your All Settings, Click On "Save Changes".
  • CONGRATULATIONS!. You've Done It!.
If You Didn't Understand, Watch The Video Tutorial Below:-

Video Tutorial

Watch In HD

Final Words!

So Friends, That Was The Simple Tutorial For You That How To Redirect Your Old Posts To New Posts. I Think That It Will Help You A Lot In You Increasing Your Traffic Of Old Posts. If You Don't Know How To Redirect Or To Set Settings, Please Ask In Comments. Share This Post With Your Friends And Blogger Fellows And Don't Forget To Share On Social Networks. Take A Lot Of Care And Happy Blogging!.

How To Write SEO Friendly Posts In Blogger?

1/26/2014


As You Know That Every Blogger Which Is Famous, Is Only By Search Engine Optimization Which Can Drive Traffic From Audience Rapidly, The Submission Of Sitemap Also Works As It Displays For Search Results On Other Search Engines Including Bing And Yahoo, Then Custom Robots Are Also Like Submission Of Sitemap, It Also Help Because It Displays The Search Results In Many Search Engines.  Well, You Know That Few Days Before, We Have Discussed A Lot Of About Search Engine Optimization, Now We Will Review It In This Post. So, We Will Tell You How To Write SEO Friendly Blog Posts To Drive Traffic From Search Engines Fastly And Avoid Copying Contents Of Others. This Post Will Help You A Lot For Your Posts, It Is The Need Of Every Post To Be SEO Friendly Not Enemy. So, Your Blog Will More Be SEO Friendly, Receive More Organic Traffic, Fast Indexing From Robots And A Lot Of Advantages (Benefits). So Now, We Are Going To Discuss About This Great Topic. Let's Start:-

Selecting Perfect Title For You Post

Choosing Or Selecting Perfect Title For Your Post Is The Most Important Part Because Google Shows Only The Posts Which Are 70 Characters Or Below 70 Because Writing Too Long Title Can Take Your Audience Attention And They Will Not Understand That What The Topic You Are Going To Discuss. And One Thing Is Very Important Choose h2  Tags In Your Post Title That Will Also Help Your Blog Posts To Display Fastly On Search Engines And To Receive Handsome Traffic.

Write On Topics You Know The Most

To Be In Best On Search Engine And In Blogger Town, You Must Select That Topic Which Your Heart Is Saying. On Other Hand, You Can Describe Your Abilities So Make Use Of Them. Only Write The Post On That Topic, Which You Know The Most. You Can Also Write Lengthy Post If You Know Much About It. You Will Never Feel Ending Wave Of Energy In Your Body And Can Lead You A Professional Writer.

Add Search Description

Search Description Is Meta Description Which Is Also Important For A Blog To Enable Because It Help In Improving Your Traffic From Search Engines, Means That It Also Checks Post By Meta Description And If The Single Keyword In The Description Matches, Then There Are Many Chances To Get Your Post On Position On Search Engines. You Must Write Atleast 100 Characters Because Above 100 Characters, Can Broke Your Description And The Description Will No Longer Be Acceptable. If You Don't Know How To Enable It, Read The Following Below:-

Add 'Alt' Keyword Attribute In Post Images

This Is An Another Important To Use 'alt' Keyword Attribute In Your Post Images Because It Will Tell The Search Engine Crawlers To See The Image Keywords Or The Keyword The Image Is Having. The Maximum For Alt Attribute Is 50 Characters So Try To Make It Shorter, But Remember To Not To Cross The Limit To 150 Or More Characters Otherwise It Will Not Be Crawled  This Will Help Your Post To Display In Google Images Because Some Of The People See Google Images. If You Don't KnowHow To Apply It, See Below.
 <a href="https://blogger.googleusercontent.com/img/b/R29vZ2xl/AVvXsEgG1rVh-i6TF_hLiaeFjg0sTh3EbrqiP6_JV6sVXxD0UwNHAo8-cBCSG6hAzvvruBJf3yt0s6eUR9VnVMXJ4krK1Pc6_AP9yVzvV3iUBjREaDnRpn2LUdjX4hKwICkliD1XbI6ZidoIYM8/s1600/download+(5).jpeg" imageanchor="1" style="clear: left; float: left; margin-bottom: 1em; margin-right: 1em;"><img alt='SEO Friendly Content' border="0" src="https://blogger.googleusercontent.com/img/b/R29vZ2xl/AVvXsEgG1rVh-i6TF_hLiaeFjg0sTh3EbrqiP6_JV6sVXxD0UwNHAo8-cBCSG6hAzvvruBJf3yt0s6eUR9VnVMXJ4krK1Pc6_AP9yVzvV3iUBjREaDnRpn2LUdjX4hKwICkliD1XbI6ZidoIYM8/s1600/download+(5).jpeg" /></a>

Avoid Keyword Stuffing

This Is Also A Main Problem With Peoples That They Write The Title Keyword Repeatedly In The Whole Post. This Is Called Keyword Stuffing Which Means To Write The Keywords Again And Again, And Not Write The Main Topic. For Example I Am Writing A Post Of 1500 Words In Which I Used The Main Title Keyword 50 Or More Than 50 Times, Than It Will Be Keyword Stuffing Which Means That You Are Writing The Keywords More Than The Main Information. To Avoid Keyword Stuffing, You Only Need To Write 2,3 Or 4% Of Keywords In Your Post Means That The Post Of 1500 Words, Should Only Contain 20 Or Less Than 20 Keyword. If You Do Keyword Stuffing, You Can Loose Traffic And This Will Be Caused By Google Penguin.

Keyword Density

This Is Also A Another Problem With People. They Write The Keywords In The Posts More Than 2 Or 3 Times. This Is Called Keyword Density Which Means To Write The Title More Than 1 Time. For Example I am Writing "How To Make Blogger Template SEO Friendly - Make Your Blogger Template SEO Friendly", So It Will Be Keyword Density. You Can See That I Have Writed That Two Times Which Is Called Keyword Density. Most Of  The People Also Writes In Meta Description And Permalinks. So Writing The Keyword In Meta Description, Permalinks And Post Title Again And Again (Repeatedly) Is Called Keyword Density. I Hope That You Will Not Do Keyword Density And Will Avoid To Protect Against Google Penguin.


Review Your Post And Check Spell Mistakes

Once You Have Finished Writing Your Whole Article, You Can Check Or Review The Whole Post To Check Whether The Post Have Not Grammatical Mistakes. So Wait And Don't Hit On Publish Button. Most Of The People Never Realized To Review The Post Because They Do Not Like To Waste Their Time But This Is Not Time Wasting, This Will Help You Increase Traffic Because If Your Any Paragraph Or Anything Is Left, Your Blog Traffic Will Decrease Because Of Google Penguin.  So It Is Important For Every Blogger To First Check Your Whole Article You Have Written, Then Hit The Publish Button.


Link Old Posts In New Posts

This Is An Amazing Trick Which Is Done By Many Blogger That The Link Their Old Posts In New Posts To Attention Their Audience To Also Read The Old Article. This Will Help You Increase Your Traffic And It Also Helps To Index Fast Your Posts And Display It On Search Engine And On Positions. You Just Need To Add A Link In Your New Post. This Can Be Done By Going At The Bottom Of The Post. But Remember That Both Posts Must Be Similar To Each Other So That That Audience May Also Read That Related Topic.

Your Turn!

So Now It's Your Turn To Try These Steps To Improve Your Traffic And Skills Of Writing. I Hope That This Post Will Help You Obviously, And Make Your Blog Posts SEO Friendly. If You Have Any Questions (I Guess Not) You Can Ask In Comments, You Can Also Write For Us For Guest Posting. Please Share This Post With Your Friends And Blogger Fellows And On Social Networks. Keep In Touch With Us To Get More Articles And Tips. Subscribe Us Now To Receive Hot Updates Straight In Your Inbox. No Spam, We Promise. Take A Lot Of Care And Happy Blogging!.


Friday 24 January 2014

How To Enable Custom Robots Header Tags In Blogger

1/24/2014


We Have Discussed About How To Enable Custom Robots.txt File In Blogger, Now We Are Back With Another Robots Tutorial. As You Know That There Is A New Section Added Called "Search Prefrences", With This, We Can Do A Lot For Increasing Traffic On Blog And Makes Your Blog More Search Engine Friendly. The Custom Robots Are The Tags Which You Are Telling Robots To Crawl The Page Which Means Indexing Your Page, Then Your Posts Are Displayed On Search Engine. Previously We Have Discussed About Robots.txt File, But Not We Will Discuss About Custom Robots Header Tags Which Is Also Available On Crawlers Section.

What Are Custom Robots Header Tags?

Custom Robots Header Tags Settings Is Similiar To Custom Robots.txt File Because In This Also, You Are Telling Search Engine Crawler's To Index Your The Area You Want. But The Difference Is That In Custom Robots.txt File, You Have To Write Commands In It But In This, You Only Have To Tick Mark Some Fields To Gain The Chance Of Increasing Your Traffic Eve More From Search Engines. This Also Helps Your Blog Posts Visibility To Many Search Engines That Means That Your Posts Will Not Only Display On Google, But Many Other Search Engines Also. You Can Use It Very Easily, Because You Just Have To Tick Mark. Below I'm Going To Tell You How To Tick Mark That Fields To Enable Custom Robots Header Tags If You Don't Know. Just Follow The Steps Below:-

Enable Custom Robots Header Tags Settings

  • Go To Blogger.com >> Your Blog >> Settings >> Search Prefrences.
  • Now In The "Crawlers And Indexing" Section, You Will See A Option "Custom Robots Header Tags".
  • Click On Edit, Then Click On "Yes" To Enable It.
  • Now You Will See A Long Box With Fields Where You Have To Tick Mark That Fields. Tick Mark Some Important Fields. If You Don't Understand, See The Screen Shot Below.

  • After You've Done Ticking Mark, Click On "Save Changes".
  • CONGRATULATIONS! You Have Successfully Enable Custom Robots Header Tags.

Final Words!

So Friends, These Was The Two Robots Files Which You Have Enabled. Now You Will Gain More And Even More Traffic From Search Prefrences But One Thing You Should Remember That Don't Copy Others Content Otherwise You Will Fastly Decrease Your Traffic By Adding These Files. We Will Teach You Each And Every Tutorial, You Can Ask Any Tutorial If You Want Me To Teach. If You Have Any Problem With This Post, You Can Comment Below And Ask. Share This Post On Facebook And Other Social Networks And Also With Your Friends And Blogger Fellows. Subscribe Us Now To Receive Hot Updates From Us Straight In Your Inbox, No Spam, We Promise. Take A Lot Of Care And Happy Blogging!.

Wednesday 22 January 2014

How To Submit Your Blogger Sitemap To Bing And Yahoo?

1/22/2014


Previously We Discussed About Submit Your Blogger Sitemap To Google, Now We Are Back. Now It's Time Too Submit Your Blogger Sitemap To Bing And Yahoo. As You Know That Google Is A Very Popular Search Engine And World's Number One Search Engine. So It Is Important For You To Submit Sitemap To Google And Other Search Engines. But In The Second Number Bing And Yahoo Are Also Very Popular. So You Must Submit Your Sitemap To Yahoo And Bing For More Traffic. So We Should Not Ignore It. Remember That Yahoo And Bing Are Connected With Each Other. So You Will Only Submit Your Sitemap To Bing And It Will Automatically Submit On Yahoo Also. Those Who Don't Know How To Submit Your Sitemap, Read The Tutorial Below.

Why Should You Submit Sitemap?

This Is Important Thing For Every Blogger To Get Success In Blogging. We Submit Sitemap To Google Yahoo And Bing Because The Posts Are Only Displayed On Google Because The Owner Of Blogger Is Google, But In Order To Display It On Yahoo And Bing, So We Should Submit It To Increase Traffic Dramatically. After Submitting Your Sitemap, The Crawlers Come To Your Site And Crawls It, Then Your Post Start Displaying On Search Engines.


How To Submit Sitemap?

As I Told Above That Yahoo And Bing Are Connected With Each Other So You Will Only Submit It To Bing, Then It Will Automatically Submit On Yahoo Also. The Steps Are Same As Our Previous Article Which Was Of Google. First They Will Verify Your Blog In Bing Webmasters Tools Then You Will Submit Your Sitemap. So Let's Get Started With Simple Steps.
  • Go To Bing Webmasters Tools.
  • Sign In To Your Hotmail Or Microsoft Account.
  • Now You Will See A Screen, There Will Be A Box Of URL. Enter Your Blog's URL There And Click On "ADD".
  • Now A New Screen Will Appear, On There, You Will See A "Add Sitemap" Option And A Box After That, On That Box, Paste The Following Code:-
http://www.yoursite.com/atom.xml?redirect=false&start-index=1&max-results=500

  • Note : The Above Is For 500 Posts. So If You Have More Than It, Paste Following Codes:-

For 1 to 500 Posts :
http://www.yourdomain.com/atom.xml?redirect=false&start-index=1&max-results=500
For 500 To 1000 Posts :
http://www.yourdomain.com/atom.xml?redirect=false&start-index=500&max-results=1000
For 1000 To 1500 Posts :
http://www.yourdomain.com/atom.xml?redirect=false&start-index=1000&max-results=1500
For 1500 to 2000 Posts :
http://www.yourdomain.com/atom.xml?redirect=false&start-index=1500&max-results=2000
For 2000 to 2500 Posts :
http://www.yourdomain.com/atom.xml?redirect=false&start-index=2000&max-results=2500 


  • Now After Adding The Code, Replace Yellow Link Highlighted With Your Blog's Domain.
  • Click On "ADD" Button.
  • Now After Clicking On "ADD" You Will Be Asked To Verify Ownership (Your Blog).
  • You Will See Like This And There Will Be A Code In The Box.

  • Now Copy The Code In The Box And Save It In Notepad.
  • Now Open A New Window { Note : Do Not Close Bing Webmaster Tools Tab}
  • Go To Blogger.com >> Your Blog >> Template >> Edit HTML.
  • Find For <head> Tag.
  • After Searching, Paste The Copied Code In Notepad Below <head> Tag.
  • Now Save Your Template.
  • Now Come To Webmasters Tools Tab And Click On Verify.
  • Now Your Sitemap Is Successfully Submitted. You Can See In Dashboard.

  • Now You Have  To Wait About A Week To Index Your Blog.
  • CONGRATULATIONS!. That's All!.

Final Words!

So Friends, You Have Finally Submitted Your Sitemap To Search Engines Which Are Google, Bing And Yahoo. Now Your Traffic Will Increase Very Fast Because Your Search Results Will Now Appear In Bing And Yahoo Also. Get In Touch With Us For More Updates Also Subscribe Us To Get Hot Updates In Your Inbox. Share This Post With Your Blogger Fellows And Friends And On Social Networks. If You Are Facing Problem In Submitting Sitemap And Not Verifying Your Blog, Then You Can Ask In Comments Because Comments Are Always Appreciated. Take A Lot Of Care And Happy Blogging!.

Tuesday 21 January 2014

How To Submit Your Blogger Sitemap To Google?

1/21/2014


We Have Discussed About How To Add Meta Description In Blogger, Enabling Custom Robots In Blogger, Now We Are Back With Another Tutorial Of SEO In Which We Will Describe About Sitemap. This Is The Important Part Of SEO As It Increases Your Traffic From Robots. You Must Be Thinking How It Is Important? Just Read This Post And You Will Get It That Was Is It. But First, Let Me Tell You About Sitemap And How It Works. Read The Below Paragraph To Know What It Is, Otherwise Leave It And Go To Submission Section.

What Is Sitemap?

Have You Ever Think About Sitemap? The Sitemap Is The Complete Map Of Your Blog That What Your Blog Contains Information Or What Kind Of Information Contains In It. It Contains All Of Your Posts And Pages Which Are Displayed On One Page. It Is Used For Better Navigation And Also For Submitting It To Search Engine For Crawling Or Indexing Whole Blog In Search Engines.

How Sitemap Works?

Submitting Sitemap To Google Is Essential And Good For Your Own Improvement. First Create You Blog And SEO Optimize It And Write Atleast 15 to 20 Articles. Then Submit Your Sitemap To Search Engines. When You Have Submitted Your Sitemap To Google, Means That You Have Submitted Your Application To Them For Crawling The Whole Blog. Now They Will Come And Completely Crawl Your Whole Blog. When It Indexes Your Sitemap, Now When Someone Will Search Any Keyword In Google After That If That Keyword Matches Then Your Post May Come In Search Results Faster And On Position. It Means That After Crawling Your Sitemap, The Posts Will Appear Your Posts On Search Results On Search Engines Faster. It Is Not So Important But It Is Good For Traffic?. So Let's Start The Tutorial For Submitting Sitemap To Google.

Submit Your Sitemap To Google

So, This Tutorial Is Long And Contains Two Main Important, So Don't Make Mistake Because First They Will Verify Your Blog In Google Webmasters Tools And Then You Will Submit Your Sitemap. So Let's Get Started.

Verify Your Blog On Google Webmasters

In Order To Verify Your Blog, Follow The Following Steps Below:-
  • Go To Google Webmasters Tools.
  • Click On Add A Site (If You Don't Have).
  • After Adding, Click On Manage Site >> Add Or Remove Users.
  • Now After Clicking, Click On Manage Site Owners And Go To Verify Using Different Method.


  • Now Tick Mark On HTML Tag.
  • Now You Will Get A Meta Code Asking You To Verify 


  • Copy That Code In Notepad And Save It.
  • Now Open A New Window In Browser {Note: Don't Close Webmasters Tools Tab}
  • Go To Blogger.com >> Your Blog >> Template >> Edit HTML.
  • Search For <head> And Below <head>, Paste The Copied Code In The Notepad.
  • Save Your Template.
  • Click On Verify Bottom At The Lower-Left Corner Of Your Browser.
  • After Clicking Verify, You Will See The Congratulations Message That You Have Successfully Verified Your Blog On Google Webmasters Tools. Now Time To Submit Your Sitemap, Let's Move To Next Step.

Submitting Sitemap

  • Go To Google Webmasters Tools.
  • Go To Your Blog's Dashboard

  • Now Click On "Crawl" Section On The Left Sidebar And Go To "Sitemaps".
  • Then Click On "ADD/TEST SITEMAP" On The Top-Right Of Your Browser.

  • Now A Box Will Appear Asking You To Write The Code For Adding Sitemap.

  • Copy The Following Code And Paste It In Box And Then Press "Submit Sitemap" Button.

atom.xml?redirect=false&start-index=1&max-results=500

  • Note : The Above Code Is For 1 to 500 Posts, But If You Have More Than If, Then Copy The Two Lines Below And Paste It On Text Box And Add It Twice:-

atom.xml?redirect=false&start-index=1&max-results=500
atom.xml?redirect=false&start-index=500&max-results=1000

  • Now Finally And Last Click On "Submit Sitemap" Button.
  • CONGRATULATIONS!. You Have Successfully Submitted To Google. Now You Have To Just Wait For A Week For Completing The Indexation.

Final Words!

So Friends, This Was The Tutorial For You That How To Submit Your Sitemap To Google. Now You Have Successfully Submitted Your Blog's Sitemap To Google, Now After Indexing Your Blog, Your Post Will Start Appearing In Search Results Fastly. Remember That Google Shows The Post One Positions Which Are Quality And Unique, So Try To Make Your Post Unique And Quality And Also Lengthy To Get More Traffic From Google. In Our Next Post, We Will Learn How To Submit Your Sitemap To Yahoo And Bing Search Engines. So Keep Visiting Us For More Updates. You Can Also Subscribe Us Now To Get Hot Updates From Us Straight In Your Inbox. No Spam, We Promise. If You Are Facing Problem With This Tutorial, Don't Forget To Ask In Comments. Share This Post With Your Blogger Fellows And Friends. Like And Share On Social Networks. Take A Lot Of Care You And Your Family. Cheers!.

Saturday 18 January 2014

How To Add Custom Robots File In Blogger?

1/18/2014


Previously, We Discussed About How To Add Meta Description, Now We Are Back With Another Great Tutorial For Search Prefrences Section. Today I Am Going To Tell You About Robots Of Search Engines Who Crawls Your Page And Index Your Blog, It Also Improves Traffic Highly. Robots.txt File Is Used By Many Bloggers But In Past Old Blogger Interface, We Were Unable To Find That Option Of Robots.txt To Enable, But Now It Is Available In Search Prefrences Section. Who Did Not Know What Is Robors.txt, In This Tutorial, We Will Learn About Robots.txt And Will Enable. So Lets Get Started!.

What Is Robots.txt File

This Is A Simple File Which The Website Owner Writes Commands For The Search Engine's Crawler. It Tells The Robots To Crawl The Index Of The Command Given. That Commands Are Written In Different Codes Which Is Only For Search Engine's Crawler. You Can See Your Robots.txt File Just By Following The Below URL:-

http://www.yourdomain.com/robots.txt

Which Areas Should You Disallow To Crawl?

So, This Question May Come In Your Mind That Which Areas Should You Disallow For Robots To No Crawl. You Can Disallow Any Area You Want For That, Your Blog Will More Search Engine Friendly And That Areas Are Search Results Pages, Archive Pages etc. Now Below, I'am Going To Tell You How To Enable Robots.txt And Make Your Blog Search Engine Friendly. Just Follow The Instructions Below:-

Enabling The Robots.txt File

So, The Process Of Enabling Is Very Easy, You Have To Just Copy A Simple Code And Paste It.Be Careful When Copying And Pasting Because If You Missed 1 Letter, The Whole Code Will Not Work. Follow The Instructions Below:-
  • Go To Blogger.com >> Your Blog >> Settings >> Search Prefrences.
  • Look At The "Crawlers And Indexing" Section.
  • Click On Edit On "Custom Robots.txt".
  • Now Click On Yes.
  • Now A Box Will Appear Asking You To Write The Code.
  • Than Copy The Code Below And Paste It In The Box-

User-agent: Mediapartners-Google
User-agent: *
Disallow: /search?q=*
Disallow: /*?updated-max=*
Allow: /
Sitemap: http://www.yourdomain.com/feeds/posts/default?orderby=updated

  • Important Note! : The Frist Line "User-agent: Mediapartners-Google" Is Used For Google Adsense Enabled Blogs. So If You Don't Have Google Adsense, Then Remove It Otherwise It Will Not Work.
  • Click On "Save Changes".
  • Done!.

Now After Adding The Code, You Must Learn That For What Reason The Each Line Of Code Is.

Explanations

  • User-agent: Mediapartners-Google : In This Command, You Are Telling The Adsense Robot To Crawl All Pages Which Are Including Or Displaying Adsense Ads.
  • User-agent: * : In This Command, You Are Calling The Robots Of Different Search Engines Example Google, Yahoo, Bing etc.
  • Disallow: /search?q=* : This Line Tells The Crawlers To Not To Crawl The Search Pages.
  • Disallow: /*?updated-max=* : This Line Disallows The Search Engine's Crawler To Not Crawl Label Or Navigation Pages.
  • Allow: / : This Line Allows To Crawl Or Index The Homepage Of  Your Blog.
  • Sitemap : This Line Tells The Search Engine's Crawler To Crawl The Every New Or Updated Post. Replace "yourdomain" With Your Domain Name.
Now I Think You've Go It!

How Can I Add Commands To The Code?

In This Part, I Will Tell You How Can You Add A Command For Disallowing Any Web Page, So If You Are Interested Adding Your Own Command, You Can Add It By Just Few Simple Steps. Here Is An Example For Disallowing Any Page Disallow: /p/sitemap.html. So, First You Need To Replace "/p/sitemap.html" Which Is The Other Part Of Domain Name With Another. It Means You Just Need To Exclude The Main Domain And Just Type Remain Part Of The Page. If You Still Not Got What To Do, Ask In Comments Freely

Final Words!

So Friends, That Was Our Robots.txt File Integration For Search Engine Crawlers. We Will Try To Give Each And Every Post With Great Tutorials Of SEO With Explanation So You Can Understand Easily. So Keep Visiting Us For More Tutorials. Please Share This Post With Your Friends And On Social Networks And Also Give Your Feedback. I Hope This Tutorial Will Help You Improve Your Traffic On Your Blog.  If You Can't Understand This Tutorial, Ask In Comments Becaus Comments Are Always Appreciated. Take A Lot Of Care Of Your Family And You And Happy Blogging!.

How To Add Meta Description In Blogger Posts?

1/18/2014


As You Know That Blogging World Is Growing Day By Day And Integrating Many New Features, There Is Also A Section Called "Search Prefrences" In Which All Of About SEO Is Described. If You Will Customize It, Your Blog Traffic Will Improve Because Of Search Engines Finding Your Blog Easily. So I Wil Describe Each And Every Part Of Search Prefrences, But First Now We Will Discuss About Meta Description. As You Know In Before Tutorial Of Make A Blogger Template SEO Friendly, This Is Also The Same, The Meta Tags Also Make Posts SEO Friendly So That It Improves SEO. In Before Tutorial, The Codes Were Meta Tags Only But They Were Only Description And Keywords, But In This We Will Add A Description For Every Post So That The Search Engines Find Your Blog More Easily. You Can Add Meta Tags For Posts Without Touching HTML Or XML Coding, Just A Simple Code To Copy And All Done. So, Let's Get Started.

What Is Meta Description?

A Meta Description Is A Description For Your Post So If Any Of The Words Are Matched On Search Engine, Than It Can Find Your Post More Easily. It Is An HTML And XML Element Which Describes Web Page To Search Engine's Crawler. In Simple Words, It Is An Information About Your Post To Search Engine's Crawler To Search The Post According To Your Description. It Also Shows On Search Results Page To Show The User The Content Which They Are Searching For On First Position.

How To Add Meta Description In Blogger?

Adding Meta Description Is Not So Difficult As I Described Above. By Default, The Blogger Has Disabled Meta Description So We Need Manually To Install. Just Follow The Steps Below:-

Instructions

  • Go To Blogger.com >> Your Blog >> Settings >> Search Prefrences.
  • In The "Meta Tags" Section, Look For Meta Description Option.
  • Click On Edit And And Select Yes.
  • Now A Box Will Appear Asking You To Write Blog Description. Just Write It.

  • Now Click On Save Changes!.
  • Done!.
So You Have Done FIrst Step For Adding Meta Description, Now The Thing Is Left To Add Description In Posts. This Step Is Only For Custom Templates Because Many Of The Templates Doesn't Contains This Code Which I Am Going To Tell. So First Search And Check It, If It Is There, Then Do Not Copy Otherwise Copy And Paste It. Follow The Steps Below:-

  • Go To Blogger.com >> Your Blog >> Template >> Edit HTML.
  • Now Search For <head> Tag.
  • Paste The Following Code Above The <head> Tag.

<b:if cond='data:blog.metaDescription != &quot;&quot;'>
<meta expr:content='data:blog.metaDescription' name='description'/>
</b:if>

  • Now FInally Save Your Template.
  • Now Let's Move To Final Step.

Add Meta Description In Every Post

Now You Have Enabled Meta Description Now You Have To Add Description In Every Post To Crawl By Search Engine's. Now It's Your Turn To Add Description Below I'm Going To Explain You How To Add Description If You Don't Know. Create A New Post.Write And Prepare Your Post, Before Publishing, Look At The Sidebar Of Post, Now A New Option Will Appear Named "Search Description", This Is The Meta Description Where You Have To Write Your Post Description. This Option Was Disabled But After Enabling On Only Homepage, It Is Available In Post And Page.


Write Your Description In The Box And Hit Done Button After Finishing. Now Publish Your Page And You Are All Done!.

Final Words!

So Friends This Was The First Part For Search Prefrences Section, But Soon We Will Describe Each Section Later. I Hope This Will Help You A Lot. Please Share This Post With Your Friends And Fellows And On Social Networks. Get In Touch With Us For Getting Updates, Also Subscribe Us To Get Updates Straight In Your Inbox No Spam, We Promise. Take A Lot Of Care And Happy Blogging!.

Friday 17 January 2014

How To Make Your Blogger Template SEO Friendly?

1/17/2014


Blogger Is A Flexible Platform Which Is Used By Millions Of People Daily And Created Many Blogs. It Is Also A Popular CMS. The Best Thing Is That It Is Owned By Google And It Allows To Control Your Blog. It Helps The Webmasters To Engage Their Blog With Google. We Can Create Blog And The Second Thing Is To Choose A Perfect Template For You. But After Applying A Template, It Is Also Important To Make It SEO Friendly So That The Search Engines Finds Your Blog Easily And At Top Position. All Of The Templates Are Not SEO Optimized So Have To Manually Make It. So If You Are Using A Template And You Haven't Optimized It, Then In This Tutorial, I Will Tell You How To Make Blogger  Template SEO Friendly By Using Few Simple Steps. So Let's Get Started.

Optimization

In Order To Optimize Your Template, You Need To Do Some Changes To Your Template In Different Parts. So Have To Simple Copy And Paste The Codes. So, Here We Are Going To Discuss. Warning! If Any Coding Is Pasted Wrong, It Will Not Optimize. So Read It Carefully Along With Simple Steps.

Display Post First In Search Results


After Seeing The Above Image, You've The Point. The Reason Your Post Title First In Search Results, Is To Improve Your Traffic. People Always See From First Post Till Last. And If Your Post Will Be On First Position, Then People Will Visit Your Blog And Your Traffic Will Increase. He/She Will Read The Letters if It Is Matched, Then He Will Click On That If It Is Matched Results Of That Letters Otherwise He/She Will Leave And Find Another. In Order To Start Displaying Your Each And Every Post First In Search Results, Follow The Simple Steps Below:-

Instructions

  • Go To Blogger.com >> Your Blog >> Template >> Backup/Restore And Backup Your Template.
  • Now Click On Edit HTML.
  • Find The Following Code:-
<title><data:blog.pageTitle/></title>


  • Replace The Above Code With The Following Code:- 
<b:if cond='data:blog.pageType == &quot;item&quot;'>
<title><data:blog.pageName/> | <data:blog.title/></title>
<b:else/>
<title><data:blog.pageTitle/></title>
</b:if>

  • Save Your Template.
  • Now You Are Done.
  • Let's Move To Next Step.

Adding Meta Description And Keyword Tags

So This Is The Second Part Of This Tutorial In Which We Will Add Meta Descriptioon And Keyword Tags. The Description Tag Will Allow The Search Engine To Search The Description And Display Post Title According To Description. The Keyword Tags Is Also Important Because It Will See The Keyword Tags And Can Display The Search Results By Also Seeing Keyword Tags. You Can Add As Many Keyword Tags As You Want For Example Tutorials Blogging Tricks etc. Note! Write It With Space Not Comma. In Order To Apply Meta Description And Keyword Tags In Blogger, Follow The Simple Steps Below:-

Instructions

  • Go To Blogger.com >> Your Blog >> Template >> Edit HTML.
  • Find For <head> Tag.
  • Once Find It, Paste The Following Code Just Below <head> Tag.
<meta content='WRITE YOUR BLOG DESCRIPTION HERE' name='description'/>    <meta content='YOUR KEYWORDS HERE' name='keywords'/>

  • Replace 'WRITE YOUR BLOG DESCRIPTION HERE' With Your Blog Description.
  • Replace 'YOUR KEYWORDS HERE' With Your Keywords.
  • Add The Maximum Of 150 Characters To Meta Description.
  • Finally Save Your Template!.
  • Congratulations!. You Have Successfully Optimized Your Template.
  • Now Let's Move To Final Step.

Optimize Post Title

This Is Said By Many Webmasters And Professional That We Should Use H2 Tags In Our Post Title For Bettter SEO. By Default, There Is H3 Or H1 Tag In Blogger Template Used For Post Title But In This, We Will Use H2 Tags So It Will Be Better Than That. Just Follow The Steps Below To Optimize:-

Instructions

  • Go To Blogger.com >> Your Blog >> Template >> Edit HTML.
  • Search For The Following Code:-
<b:if cond='data:post.title'>

  • You Will See Something Like This:-


  • You Can See The h3 Tags  In The Above Image On The Second Line Of Selection. Then There Is Another h3 Like This </h3>. Now Replace The Two h3's Tags With H2 Tags. After Replacing Your Should Look Something Like This:-

  • After Optimizing, Finally Save The Template.
  • CONGRATULATIONS! You Have Successfully Optimized Your Template And Completed This Tutorial!.

Final Words!

So Friends That Was The Tutorial For Make Yout Blogger Template SEO Friendly. I Hope This Tutorial Helps You A Lot Because It Is Described With Images. If You Still Can't Understand Where To Paste The Code Or Any Another Problem, Feel Free To Ask In Comments Because Comments Are Always Appreciated. Keep Visiting Us For More Tutorials And Tricks. Happy Blogging!.

Helping You To Know The Knowledge Of Blogger Blogging Since 2014™.