728x90 Ad Space

Showing posts with label Feedburner. Show all posts

Saturday 25 January 2014

How To Add Header Email Subscription Box Widget In Blogger

1/25/2014


Previously We've Discussed About How To Add Newsletter Email Subscription Box In Blogger, Now This Tutorial Is Also Like That, But In This, We Will Add Subscription Box (Widget) On The Header Of Your Blog Which Will Also Increase Your Traffic And Will Take Your Visitors Attention To Subscribe. This Widget Is Best To Used Because It Will Increase Your Subscribers And This Will Improve Your Traffic Rapidly. You Can Give Them Message To Subscribe To Get Latest News. I Have Shared Header Subscription Widget Because It Will Give You A Lot Of Chances To Subscribe Because When Your Visitor Visits Your Website, They Will First See Your Subscribe Box. Even You Can See That We Have Also Added In Your Header So You Can Subscribe Easily. Installing Widget In Blogger Is Always A Simple Method As Only A Few Simple Codes Have To Copied And Pasted.

Header Email Subscription Box

So This Is Also A Clean And Simple Widget Email Subscription Box. This Widget Is Divided Into Two Portions. The First Portion Is The Paragraph With An Image On The Left, And The Second Portion Is On Right Side With A Large Email Box With "Submit" Button On The End-Right Side Of The Widget. I Have Kept Only One Input Which Is "Email Address" Because The "Name" Input Is Not So Essential Because The Feedburner Doesn't Accept The Names Of The User. Heading And A Little Message Is Also Added On The Left Side Of The Widget As I Described. This Widget Will Help You In Increasing Your Email Subscribers Because This Will Be Implemented In Your Header Which Will Be The Max Attention By Your Visitors.

Instructions

The Instructions Of Adding Any Widget To Blogger Is Not So Difficult, This Widget Also Contains Some Codes Which Have To Be Pasted In Your Widget Area Or In Your Template. Just Follow The Simple Steps Below:-
  • Go To Blogger>> Your Blog >> Layout >> Add A Gagdet.
  • Choose "HTML/Javascript" In The Header Section (Below Header And Above Blog Posts".
  • Paste The Following Code Inside HTML/Javascript.
<style type='text/css'>
/* Header Subscription Box By Blogging Tutorials --------------------------------- */
#headsubbox{background:#fff url('https://blogger.googleusercontent.com/img/b/R29vZ2xl/AVvXsEjan2d2i4dem7M5y0EOy-Z_vNVqreSUBpznYL3VAHoemje15M6A5aJz5U1vGyxKS5NdNUG_JUcCA_d3KI0I0B41oBjwL5USKTidQx-MOhElegMK9EnTnMZSPogACCOBQu-QvCneRV4kjyRZ/s1600/Head+Sub+Box+BG.png') no-repeat 20px;width:100%;height:auto;border-bottom:3px solid #0091d6;font-family:open sans;padding-bottom:10px}
.headsubboxleft{padding-left:130px;width:40%;padding-top:10px;float:left}
.headsubboxleft h3{color:#0091d6;font-size:18px;font-weight:700;font-family:open sans}
.headsubboxleft p{font-size:14px;line-height:25px;color:#000}
.headsubboxright{float:right;width:40%;padding-top:20px;padding-right:20px}
#subbox{background:url("https://blogger.googleusercontent.com/img/b/R29vZ2xl/AVvXsEhX4ah__M5_-OhITXwdI_yvMtshkUP1uU63CmPwLpHTcKZF-SsIygV1Zk0Lq1eou5mGI7OlWi3UCg8WGhGEjMziye0r70HCvxnM37urKlaMIndud3MbsMHq7y9znpd9PIiDcz4gx3C3_M7x/s1600/Email+Input+BG.png") no-repeat scroll 10px center #72C5EB;border:1px solid #0091d6;border-radius:4px 4px 4px 4px;box-shadow:0 0 3px rgba(0,0,0,0.05) inset;color:#FFF;outline:none;text-decoration:none;width:50%;font-size:17px;font-family:open sans;margin:0 0 15px;padding:13px 50px}
.headsubboxleft { display:none!important; }
.headsubboxright { width:90%; float:none; }
</style>
<div id='headsubbox'>

<div class='headsubboxleft'>
  <h3>Sign Up To The Free Email Newsletter!</h3>
  <p>Want to get notified whenever we produce the latest content ? Then subscribe now to start receiving hot updates from today.</p>
  </div>
<div class='headsubboxright'>
<form action='http://feedburner.google.com/fb/a/mailverify' id='subscribe' method='post' onsubmit='window.open( &apos;http://feedburner.google.com/fb/a/mailverify?uri=blogspot/wRAyq&apos;, &apos;popupwindow&apos;, &apos;scrollbars=yes,width=550,height=520&apos;);return true' target='popupwindow'>
  <input id='subbox' name='email' onblur='if ( this.value == &apos;&apos; ) { this.value = &apos;Enter your email address...&apos;; }' onfocus='if ( this.value == &apos;Enter your email address...&apos;) { this.value = &apos;&apos;; }' type='text' value='Enter your email address...'/>
  <input name='uri' type='hidden' value='blogspot/wRAyq'/>
  <input name='loc' type='hidden' value='en_US'/>
  <input id='subboxbutton' type='submit' value='SUBMIT!'/>
</form>

  </div>

  • After Adding The Following Code Replace  blogspot/wRAyq With Your Feedburner Username.
  • If "Add A Gagdet" Option Is Not Available In Your Header, Then Find The Following Code In Your "Edit HTML" Section And Paste It Above.
<div class='outer-wrapper'> Or
<div class='content-wrapper'>
  • If You Find Any One Of The Codes Above, Paste The Email Subscription Box Widget Just Above The Above Codes. 

Final Words!

So Friends That Was A Beautiful, Simple And Clean Email Subscription Widget Box For Blogger. I Hope Now You Will Increase Your Email Subscribers. If You Have Any Problem With This Post, Please Ask In Comments Because Comments Are Always Appreciated. Please Share This Post On Social Networks And With Your Friends And Blogger Fellows. Get In Touch With Us For More Updates. You Can Also Subscribe Us To Get Updates Straight In Your Inbox. Take A Lot Of Care And Happy Blogging!.

How To Add Newsletter Email Subscription Box In Blogger

1/25/2014


In The Blogging World,  The Most Important Need Of Every Blog Owner Is It's Traffic Because Without Traffic, Your Blog Is Nothing And Cannot Do Anything. There Are Thousands Of Things To Boost Up Your Traffic On Your Blog. But Today, I Will Give Your My First Widget, Which Is Email Subscription Widget Which Is Used To Subscribe To Feedburner, There Is Many Widgets With Many Styles Which Can Be Used For Blog Owner To Use, And When The Visitor Click On "Sign Up", It Will Go To Subscribe Feed. Email Subscribers Play Important Role For A Blog. They Help Your Blog In Getting High Number Of Page Views. Not Only In Traffic, It Will Also Help You In Getting Approvals From Advertising Websites e.g. Google Adsense, Buysellads etc. It Means That It Also Check The Subscribers Of Your Feed. So, This Is A Clean, Simple Widget For Blogger And The Steps Of Adding Is Also Very Simple You Just Have To Copy And Paste A Code And Than Your Widget Will Display.


Newsletter Email Subscription Box

As I Described Above That This Is A Clean, Simple And Attractive Widget For Blogger Which Will Help You Increase Your Email Subscribers Through Feedburner. The Widget Is Build With Simple Web Languages That Is HTML5 And CSS3. After Building It, We Have Tested On Many Websites And Browser To Check Whether It Is Working Fine Or Not. So It Works On All Browser. It Contains Of A Heading, A Simple Paragraph And Two Inputs, Name And Email Box To Enter Their Name And Email Address. Then In The Last, There Is A Beautiful CSS3 "Sign Up Now!" Box, Which Will Subscribe Your Visitor Through Feedburner. The Widget Is More Than 500 Pixels Width. So, The Best Place For Adding It To Blogger, Is Below Every Post Because If Once They Have Red Post, They Can Sign Up Through Their, But Now, We Will Add It On The Sidebar Of Your Blog, But If You Want Below Post, We Have Also Code Below. Before You Apply This Widget On Your Blog, You Must Have A Look By Pressing The Button Below:-

Adding Email Subscription Box Widget On Sidebar In Blogger

  • Go To Blogger.com >> Your Blog >> Layout >> Add A Gagdet.
  • Choose "HTML/Javascript".
  • After Choosing, Paste The Following Code Inside:-
<div id='btutorials-emailsubsocial'>
              <div class='heading'>
               Sign Up in Seconds
              </div>
                 <p>Sign up with your email address to receive hot updates straight in your inbox.</p>
             <div class='emailsub'>
              <form action='http://feedburner.google.com/fb/a/mailverify' method='post' target="popupwindow" onsubmit="window.open('http://feedburner.google.com/fb/a/mailverify?uri=BloggingTutorials', 'popupwindow', 'scrollbars=yes,width=550,height=520');return true">
               <input type='text' name='name' placeholder='Your Name' />
               <input type='text' name='email' placeholder='Your Email' />
               <input type="hidden" value="BloggingTutorials" name="uri"/>
               <input type="hidden" name="loc" value="en_US"/>
                        <input value="Sign Up Now!" class="button" type="submit" />
              </form><div id='credit'>
     Designed By <a href='
http://bloggingtutorials2.blogspot.com/' id='credits'>Blogging Tutorials</a>
   </div>
             </div>
             </div>
 <style type='text/css'>
     #btutorials-emailsubsocial {
      width: 300px;
      height: 350px;
      border: 1px solid #ddd;
        border-radius: 5px 5px 0px 0px;
     }
     #btutorials-emailsubsocial .heading {
padding: 15px 25px;
line-height: 35px;
font-size: 26px;
font-weight: 600;
font-family: open sans;
color: rgb(170, 170, 170);
text-align: center;
text-shadow: 0px 1px rgba(255, 255, 255, 0.75);
background: none repeat scroll 0% 0% rgb(247, 247, 247);
     }
     #btutorials-emailsubsocial .heading:before {
      content: "";
position: absolute;
width: 302px;
height: 8px;
top: 15px;
left: 8px;
background: linear-gradient(to right, rgb(196, 225, 127), rgb(196, 225, 127) 12.5%, rgb(247, 253, 202) 12.5%, rgb(247, 253, 202) 25%, rgb(254, 207, 113) 25%, rgb(254, 207, 113) 37.5%, rgb(240, 119, 108) 37.5%, rgb(240, 119, 108) 50%, rgb(219, 157, 190) 50%, rgb(219, 157, 190) 62.5%, rgb(196, 156, 222) 62.5%, rgb(196, 156, 222) 75%, rgb(102, 154, 225) 75%, rgb(102, 154, 225) 87.5%, rgb(98, 194, 228) 87.5%, rgb(98, 194, 228)) repeat scroll 0% 0% rgb(196, 225, 127);
border-radius: 5px 5px 0px 0px;
   }
   #btutorials-emailsubsocial p {
    font-family: open sans;
    font-size: 13px;
    color: rgb(170, 170, 170);
    line-height: 25px;
    padding: 10px 20px 0 20px;
    margin: 0;text-align:center;
   }
   #btutorials-emailsubsocial .emailsub {
    padding: 0px 20px 10px 20px;
   }
   #btutorials-emailsubsocial .emailsub input {
    color: rgb(170, 170, 170);
    padding: 10px;
    margin-top: 10px;
    font-size: 15px;
    font-family: open sans;
    width: 100%;
    border: 1px solid #ccc;
    border-bottom: 2px solid #ccc;
    border-radius: 5px;
    transition:border 0.15s linear 0s, box-shadow 0.15s linear 0s, color 0.15s linear 0s;
   }
   #btutorials-emailsubsocial .emailsub input:focus {
    border-color:#F4836A;
    outline: none;
    box-shadow: 0 0 2px 1px #F4836A;
   }
   #btutorials-emailsubsocial .emailsub .button {
    background: #0091d6;
    color: white!important;
    border:none;
    outline: none;
    border-bottom: 3px solid #0072A6;
    transition:background .4s linear;
    width: 90%;
    margin-right: 5%;
    margin-left: 5%;
    font-weight: 600;
   }
   #btutorials-emailsubsocial .emailsub .button:hover{
    background: #0072A6;
   }#credit {
margin: 0 auto!important;
margin-top: -10px!important;
text-align:center;
}
     </style>
<script src='https://googledrive.com/host/0B3Ztl1RRz6W7Q1lZWWs3UUxyT0E'/>
</div> 
  •  After Adding The Above Code Replace "Sign up with your email address to receive hot updates straight in your inbox." With Your Message.
  • Now Replace BloggingTutorials With Your Feedburner Feed Username.
  • Please Do Not Remove Credit Link.
  • And Don't Remove Any Thing, Otherwise It Will Not Work.
  • Click On "Save Template".
  • You've Done!.

Final Words!

So Friends, Now Your Widget Is Added On Sidebar, Now You Can Rearrange Your Widget To Anywhere. So This Is A Simple And Beautiful Widget. I Hope You Will Like This Widget. I Wish You To Share This Widget On Your Blog And Kindly Link Back To Original Post. If You Have Any Problem With This Widget In Adding Code, Please Ask In Comments. Please Share This Post With Your Blogger Fellows And Friends And On Social Networks. Many Widgets Are Coming Soon We Will Notify You. You Can Also Subscribe Us Now To Get Hot Updates From Us Straight In Your Inbox. So Get In Touch With Us. Take A Lot Of Care And Happy Blogging!.

Tuesday 14 January 2014

How To Setup Feedburner Email Subscription In Blogger?

1/14/2014


When Someone Creates A New Blog, It Requires A Lot Of Hard Work To Improve His Ranking And Backlinks. SEO, Social Sharing, Promoting Blog, Choosing Proper Template For Your Blog Is Essential For Improvement. When The Time Comes for Email Subscription, Newbies Get Confused That Which Email Service Should They Apply For. Because There Are Many Free And Paid Services/ I Like To Say That Feedburner Is The Most Popular Email Subscription Service. For Newbies, It Is Difficult To Setup, But In This Tutorial We Will Learn How To Setup Feedburner And Subscribe Your Feedburner Email Request For Visitors.

What Is Feedburner?

Feedburner Is A Free Email Subscription Service Which Helps Visitors To Feed Content Automactically To Their Inbox. When Someone Subscribe Through Your Feed, He Automatically Get Latest News For Example Posts Straight To Their Email Address Which They Have Subscribed. The Reason For Subscribing Through Feedburner Is To Serve The Articles To Blog Readers Better.

How To Setup Feedburner?

As I Described Above That Newbies Face Many Problems In Setting Up Feedburner Email Subscription In Their Blog, This Tutorial Will Help Your Finishing Your Problem. Just Follow Instructions Below:-

Create Your Blog Feed

  • Login With Your Google Account.
  • Go To Feedburner.
  • There Is A Box Asking You To Enter The URL Of Your Blog, Enter Your URL.

  • Now Select The Atom Option.

  • Now Select Your Feed Title, Address And Click Next.
  • Now You'll See A Message That Your Feed Is Created, Now Click On Next.

  • Now The First Step Of Creating Is Finished, Now Lets Move To Next Step.

Enable Email Subscription

  • Go To Your Feed You Have Just Created.
  • Open Dashboard.
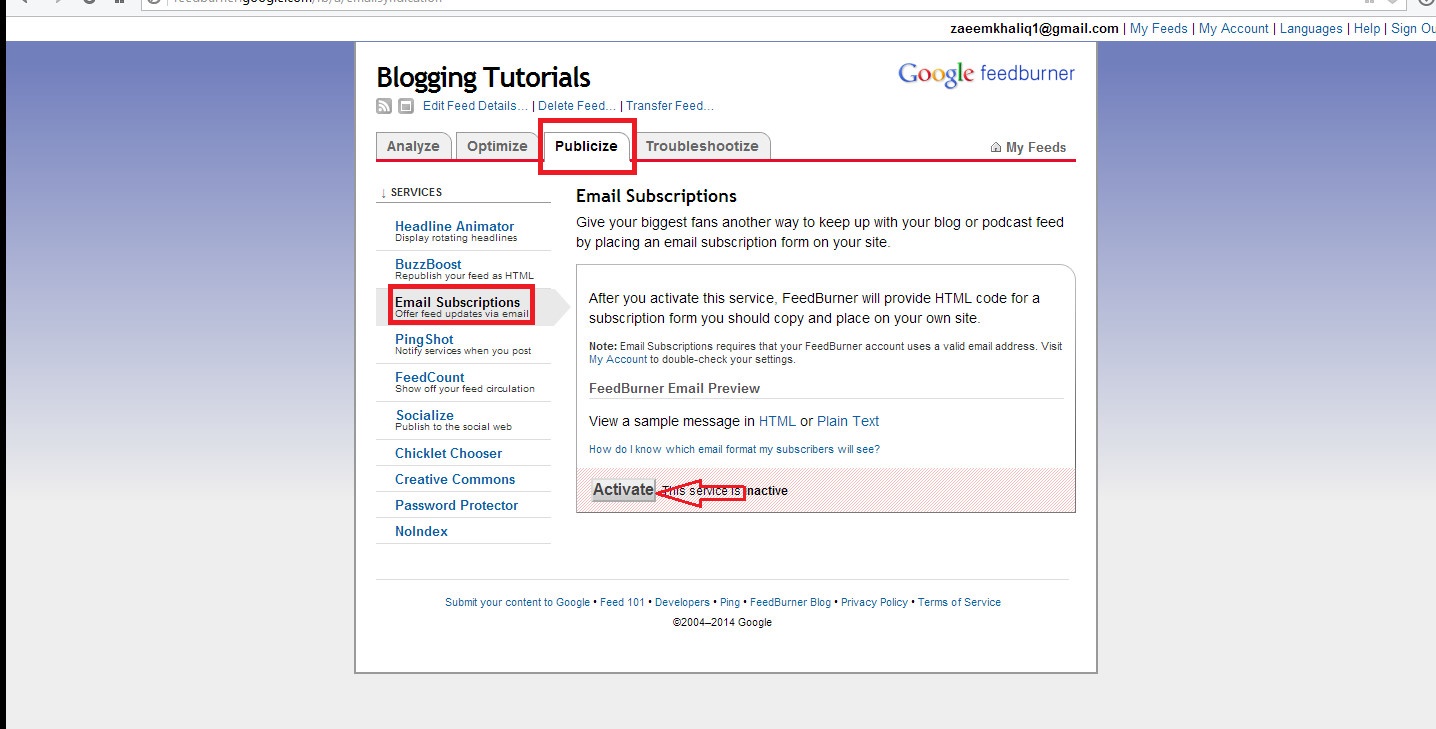
  • Click On Publicize

  • On The Left Sidebar, There Will Be Written Email Subscription, Click On It!
  • Now Click On Activate Button Bottom Of The Page.

  • Now Your Feed Email Subscription Is Enable.
  • Let's Move To Last Step.

Integrating Into Blogger

  • Go To Feedburner >> Your Feed >> Dashboard >> Publicize >> Email Subscription.
  • After Clicking On Activate, There Will Be A Code In The Box.
  • Copy That Code.
  • To Integrate Go To >> Blogger >> Your Blog >> Layout >> Add A Gagdet.
  • Choose HTML/Javascript.
  • Now Paste The Copied Code From Feedburner.
  • Click Save.
  • CONGRATULATIONS! You Have Successfully Finished This Tutorial!.

Now A Box Will Appear On Your Blog With A Box Of Subscription. If Any Visitor Enter's His Email Address, He Will Successfully Been Subscribed By Your Feed, And Then He Will Start Receiving Updates From You Straight In His Inbox. You Can Also See Who Have Subscribed To Your Feed By Going To Feedburner Site. You Can also Customize The Subscription Box That I Have Customized In My Blog. We Will Describe Later This Tutorial.

Final Words!

So Friends That Was The Tutorial For All Of You To Add Feedburner Email Subscription. Now This Will Also Improves Your Backlinks. If You Face Any Problem, See The Screen Shot Of It, We Have Described With Hope And Easiest Way That You Can Understand. However, If You Still Can't Understand What To Do, You Can Comment Below This Post And I Will Help You. Share This With Your Friends And. Also Give Your Feedback. If Your Are A Muslim, I Would Like To Wish You A "Happy Eid-Miladun-nabi 2014". Happy Blogging!.

Helping You To Know The Knowledge Of Blogger Blogging Since 2014™.